
So here are the basics to understand how to actually machine embroider an item...
Machine Embroidery 101
There are four basic things you need to do in order to get a design embroidered on an item.
-
Obtaining a digitized embroidery design file.
-
Loading the design file onto the embroidery machine.
-
Stabilize the fabric and position it to be embroidered.
- Start and monitor the machine as it embroiders.

1. Embroidery Design Files
- In order for a design to be embroidered, it needs to be digitized into a format that your embroidery machine understands.
- Different brands of machines support different file formats:
- .pes Brother, Baby Lock - most common format used by home machines.
- .hus Husqvarna-Viking - second most popular
- .jef Janome and Kenmore
- dst commercial embroidery machines.
- .art Bernina
- Software is available which can convert embroidery files to other formats.
- Embroidery designs are available for purchase online and on CD/DVDs. Many designs will come preloaded on your embroidery machine as well.
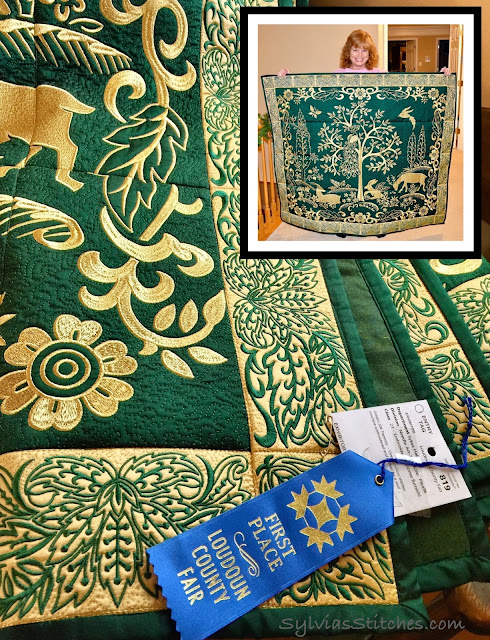
Embroidery Design Characteristics
 |
| This design fits in a 4"x4" hoop. It contains 24,955 stitches. |
 |
| This is the same 4"x4" design without the background fill. It contains 12,371 stitches. |
- Stitch Count - number of stitches the design contains. This is an indicator of the amount of work needed to stitch the design. An embroidery machine's "speed" specification indicates the maximum stitches per minute the machine will do. Home embroidery machines range from about 400 to 1000 stitches per minute.
- Density - the density of the stitches in a design will factor into how heavy it will lay on the fabric, and the type of stabilizer needed to support the design on the chosen fabric. The more open, less dense a design is, the lighter it be on the fabric. The more dense the amount of stitches are in a design, the more support it will need.
 |
| Some machines can use embroidery cards to transfer designs to your embroidery machine. Other machines accept USB. |
- Design Size - home embroidery machines come with one or more hoops to accommodate various design sizes. The most common size is a 4"x4" hoop, then the 5"x7" hoop.
2. Loading the Designs
Now that you have a design - you need to load it on your embroidery machine...
- Many designs are usually included in our embroidery machine's memory.
- Either a USB stick, USB cable from your computer, or an embroidery card can be used to transfer embroidery designs to your embroidery machine.
3. Stabilizing the Fabric
- Before you start stitching, you need to stabilize the fabric so that it can support the extra weight and tension that will be added by the embroidery.
- There are four basic types of stabilizers: cut-away, tear-away, heat-away, wash-away. They are available in different weights and forms. See comparison chart below (courtesy threadsmagazine.com)
Stabilizers at a glance
| Used for: | Best used on: | Comes in: | Removal: | |
| Cut-away stabilizers | Permanent support | Knits, loosely wovens | Light to heavy weights | Not removed, except for cutting away excess |
| Tear-away stabilizers | Temporary support | Firmly woven, natural-fiber fabrics | Light to heavy weights; fusible and nonfusible | Torn away, but not always completely removable, depending on brand and stitch pattern |
| Heat-away stabilizers | Temporary support | Nonwashable, delicate fabrics and for off-the-edge stitching techniques | Woven sheets, plastic film | Completely removable with iron and caution |
| Wash-away stabilizers | Temporary support | Delicate, mesh-like, and difficult-to-mark fabrics; also for cutwork and embroidered appliqués | Plastic film, paper sheets, brush-on or sprayable liquid | Completely removable with water |
- Recommend test-stitching your fabric and stabilizer first.
- Denser stitch-count designs require a stronger stabilizer.
- Use sticky-back stabilizers for items that are awkward to hoop, or may be marked by hooping.
- Temporary spray-adhesive is also useful to stabilize the fabric while doing embroidery.
- Thin, plastic wash-away stabilizers are good to use for toppings to prevent the stitching from being lost in the nap of fabric.
4. Start Embroidery, Change Threads as Needed
- Watch your embroidery as it goes to take care of any issues (thread changes, breakage etc...)

- Thread tension for embroidery is best with a slightly tighter bobbin tension so that only the top thread shows on the correct side.
- Start each project with a fresh new needle.
- Choose the correct need for the project (embroidery, metallic, needle size, etc...
- Use embroidery thread or embroidery bobbin thread in the bobbin. The weight of the bobbin thread should be less or equal to that of the top thread.
Online Resources I Have Found Helpful for Embroidery
- Sew Forum
- Embroidery Library
- Artistic Thread Works
- Brother Sews
- Ann the Gran
- Yahoo! Groups for your embroidery machine.


No comments
Thank you so much stopping by and adding your thoughts. I read and appreciate each comment. ♡♡♡
Note: Only a member of this blog may post a comment.