Thought I would help welcome in spring with a little bird & floral table runner. 🐦🌸 I shared this photo in the
Destiny Owners group on Facebook. Received several questions on how it was done with IQ Designer's help. So here is how I did it:
This runner was made similar to the
Saint Patrick's Day table runner I made recently.
The bird blocks are 8" finished, the sashing is 2" finished and the binding is .5".
Designs:
Materials:
- Four 8.5" squares of light background fabric (I chose to embroider the bird first, then cut to size)
- Thirteen 2.5" x 8.5" strips of dark green fabric
- Ten 2.5" squares of light green fabric for corners
- Backing fabric (I bought one yard of a complimenting floral)
- Cotton Batting
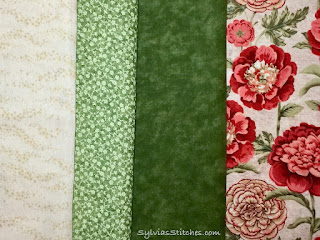 |
| My fabric choices. All found at my local Jo-Ann store. |
I like to design everything in EQ7 first, just so I can get a good visual of what I'm aiming for. :)
|
|
| Preview of table runner done in Electric Quilt 7. |
To Make the Table Runner Top:
- Embroider the birds. Embroider a bird for each block on the light background fabric. I hooped cutaway stabilizer along with the fabric. After the bird embroidery finished, I trimmed both layers to 8.5" square, centering around the design.
- Piece your table runner quilt top.
- Use 1/4" seams.
- Lay your blocks and pieces out they way you want to table runner to appear. Piece your top together. Here is how I did mine:
- Stitch two dark green 8.5" strips to the left and right sides of your first and last embroidered block. I pressed the seams to the dark side.
|
|
Add side borders on first and last blocks.
|
- Stitch one dark green 8.5" strip on the right side of your second block.
|
|
Stitch a side border to your second block.
|
- Stitch two small light green 2.5" squares to both sides on four dark green strips.
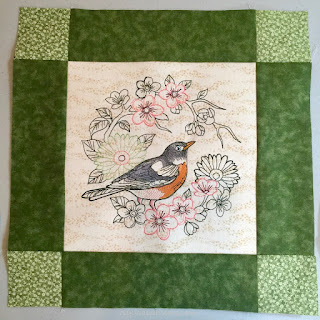
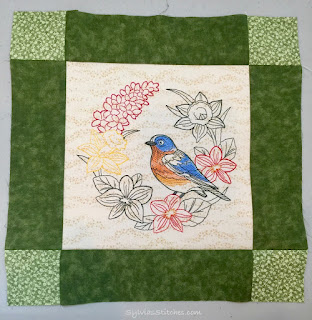
- Stitch these strips to the top and bottom of the first and last blocks to complete them.
 |
 |
First block with borders
|
Last block with borders.
|
- Stitch one small light green 2.5" squares to the right side on two dark green strips.
- Stitch these strips to the top and bottom of the second block to complete it.
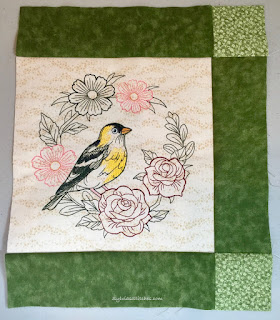 |
Second block with borders.
|
- Stitch two 8.5" green strips to top and bottom of the 8.5" third block.
|
|
Third block with borders.
|
- Stitch the first, second, third and forth block together in order. (matching up seams) to complete your table runner row.
|
|
| Complete table runner top. |
- Quilt Your Table Runner.
- Lay the backing fabric, face down on your cutting surface. (I had to piece my backing to make it large enough with 4" extra width all around).
- Add a layer of cotton batting. I cut mine the same size as my backing.
- Lay the table runner face-up on top of this.
- Pin-baste the quilt sandwich.
- Quilt as desired. 😃 I chose to quilt-in-the-hoop. Here is how I did mine:
- I loaded cotton thread and slowed down my machine speed a bit.
- Once you know the steps, it really does not take long to get the fill stitches drawn.
- I removed the basting pins that were in the way of the block I was working on.
Background Fill using IQ Designer:
- I hooped the quilt sandwich for each main block and used my Destiny to scan the hoop using IQ Designer.
 |
Steps to scan in your hooped quilt sandwich.
|
- I selected the Line tool key, selecting the zig-zag line type. Also select the "no-stitch" key so there will not be a stitched border.
- Use the stylus and tap around the embroidery design. IQ Designer will connect the dots and form a closed shape.
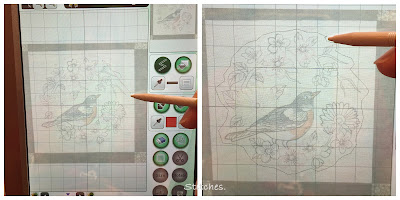 |
Tap around the embroidery image to form a closed-shape.
|
- I then selected a Stamp key Outline shape of a square, then enlarged it and moved it to fit the main block.
|
|
| Steps to add a Stamp key shape to define the outer border of my area to fill with quilting stitches. |
- I selected the Drawing Region tool key, selecting the paint can, with a quilting fill. (In photo step #3 below, is where you can tap on the Select button to see other fill choices.) Tap inside the two shapes to fill the area with quilting stitches.
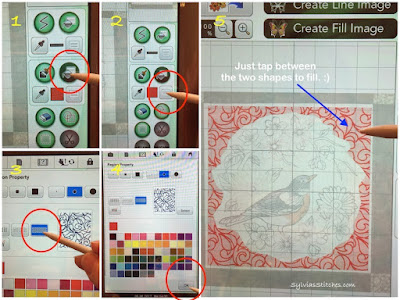 |
Steps to fill the background with quilting stitches.
|
- Select the Next key to make any adjustments to the stitches. I did not make any changes to mine. Save your file to your machine, just in case. Then Preview, and Set to go to Embroidery mode. I stitched with a matching color. The red in the pictures is just so it can be seen.
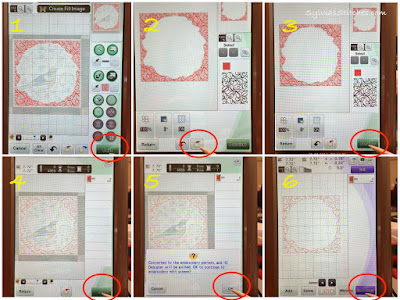 |
Steps to get design from IQ Designer to Embroidery Mode.
|
- Because these are quilting stitches, I wanted to reduce the thread knots showing on the back of the runner. I would do one stitch, pause and pull up the bobbin thread to the top of the quilt. Then hold the thread tails out of the way and continue stitching. Trim them when the needle is away from the area.
- I repeated the above steps for each block to add quilting fill stitches around the embroidered birds.
Adding Embroidery Quilting Designs to Borders and Corners:
- This is the easy part. Just add embroidery designs as you normally do.
- In Embroidery mode, add one of the quilting designs.
- Hoop and scan the quilt sandwich for the border/corner area.
|
|
Use this button to scan the hooped quilt sandwich.
|
- Add another quilting corner and/or border. As much as can fit for your hooped area. Drag and drop the designs where desired.
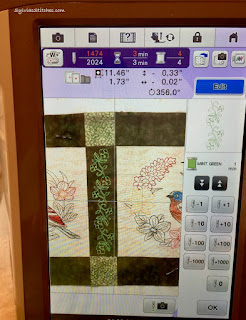 |
About to embroider the border and corners.
|
- Embroider as normal - except I would pause after the first stitch to pull up the bobbin thread. Hold the thread tails and then continue stitching. Trim when able. This reduces the thread knots and tails on the backside.
- Repeat the hoop/scan/embroider steps for the remainder of the table runner.
- TIP regarding Scanned Fabric in Embroidery Mode:
- When you are done with your embroidery work after using the machine's camera to scan in your fabric/quilt sandwich, you may notice the last scanned image is still displayed in the background on the screen. I noticed it was still on my screen, even after getting out of embroidery mode and back in, and even turning off my machine!
- The solution is in the Setting Screens, page 9. Background Image Display can be turned Off. Or you can press Delete button to remove it. That is what I did. :)
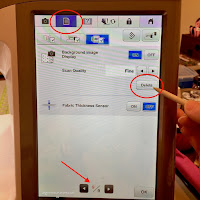 |
| How to remove the scanned image from your display. |
Bind the Quilt:
|
|
Finishing the last of the self-binding.
|
Someone asked to see the back of the table runner, so here it is. I used a cream colored thread in the bobbin.
 |
Back side of table runner.
|
That's it!
I'm sharing this post on
Show-Off Saturday and
Slow Sunday Stitching,
Sew Can Do, and
FreeMotion Linky Tuesday.





Great job. Thanks for the tutorial. Aren't our machines wonderful?
ReplyDeleteLove love love our awesome machine! :)
DeleteWonderful tutorial! Thank you for sharing this with us.
ReplyDeleteThanks. Hope you find it useful.
DeleteThank you so much for taking the time to share this pictorial tutorial! I will be using it!
ReplyDeleteyay! Hope if helps. :)
DeleteWow I did not really comprehend how people were doing this thanks for the directions
ReplyDelete